

The Data Import / Export section of the Administration area controls how room and asset data moves between Innomesh and external systems. Scheduled imports populate dynamic room fields from files delivered by external systems, scheduled exports push Innomesh data out on a recurring basis, and manual imports handle one-off updates directly from your browser.
Both dynamic import and export use a shared data repository for secure transit between Innomesh and the external system. For the full pipeline architecture, data formats, and derivation strategies, see Dynamic Data Import & Export.
Prerequisites
- A role with the Edit data import / export configurations permission. Roles with view-only administration access can see configurations but not change them.
- For scheduled imports and exports, the shared data repository enabled by Innomate.
- For imports, the dynamic room fields you want to populate, set up by Innomate.
Accessing Data Import / Export
Navigate to Administration > Data Import / Export. The page has two tabs: Data Import and Data Export.
Getting Started with Data Import
- Ask Innomate to set up the dynamic room fields you need.
- Prepare a CSV or JSON file with one record per room. The room name in each record must match the room’s name in Innomesh.
- Create your import configurations. See Configuring a Data Import.
- Upload the file with Manual Import, or have your system deliver it to the shared data repository.
{{ROOM_NAME}} stays as plain text, so put the final values in the file.Configuring a Data Import
Import configurations map a field in an incoming file to a dynamic room field in Innomesh. Dynamic room fields are updated automatically each time a matching file arrives and are not user-editable.
- Open the Data Import tab.
- Click Create New. A new configuration row appears in the table.
- Complete the fields:
| Field | Description |
|---|---|
| Dynamic Room Field | The room field this import populates, selected from the dynamic room fields defined in your tenancy |
| Import Filename | The name of the file to ingest from the shared data repository (e.g. room-data.json) |
| File Format | CSV or JSON |
| Path to Room Name | Where in each record to find the room name used to match the record to an Innomesh room. For JSON files, use a JSONPath expression such as $.rooms[*].name. For CSV files, use the column heading |
| Path to Import Field Value | Where in each record to find the value that populates the dynamic room field. For JSON files, use a JSONPath expression such as $.rooms[*].capacity. For CSV files, use the column heading |
- Click the tick at the end of the row to save the configuration.
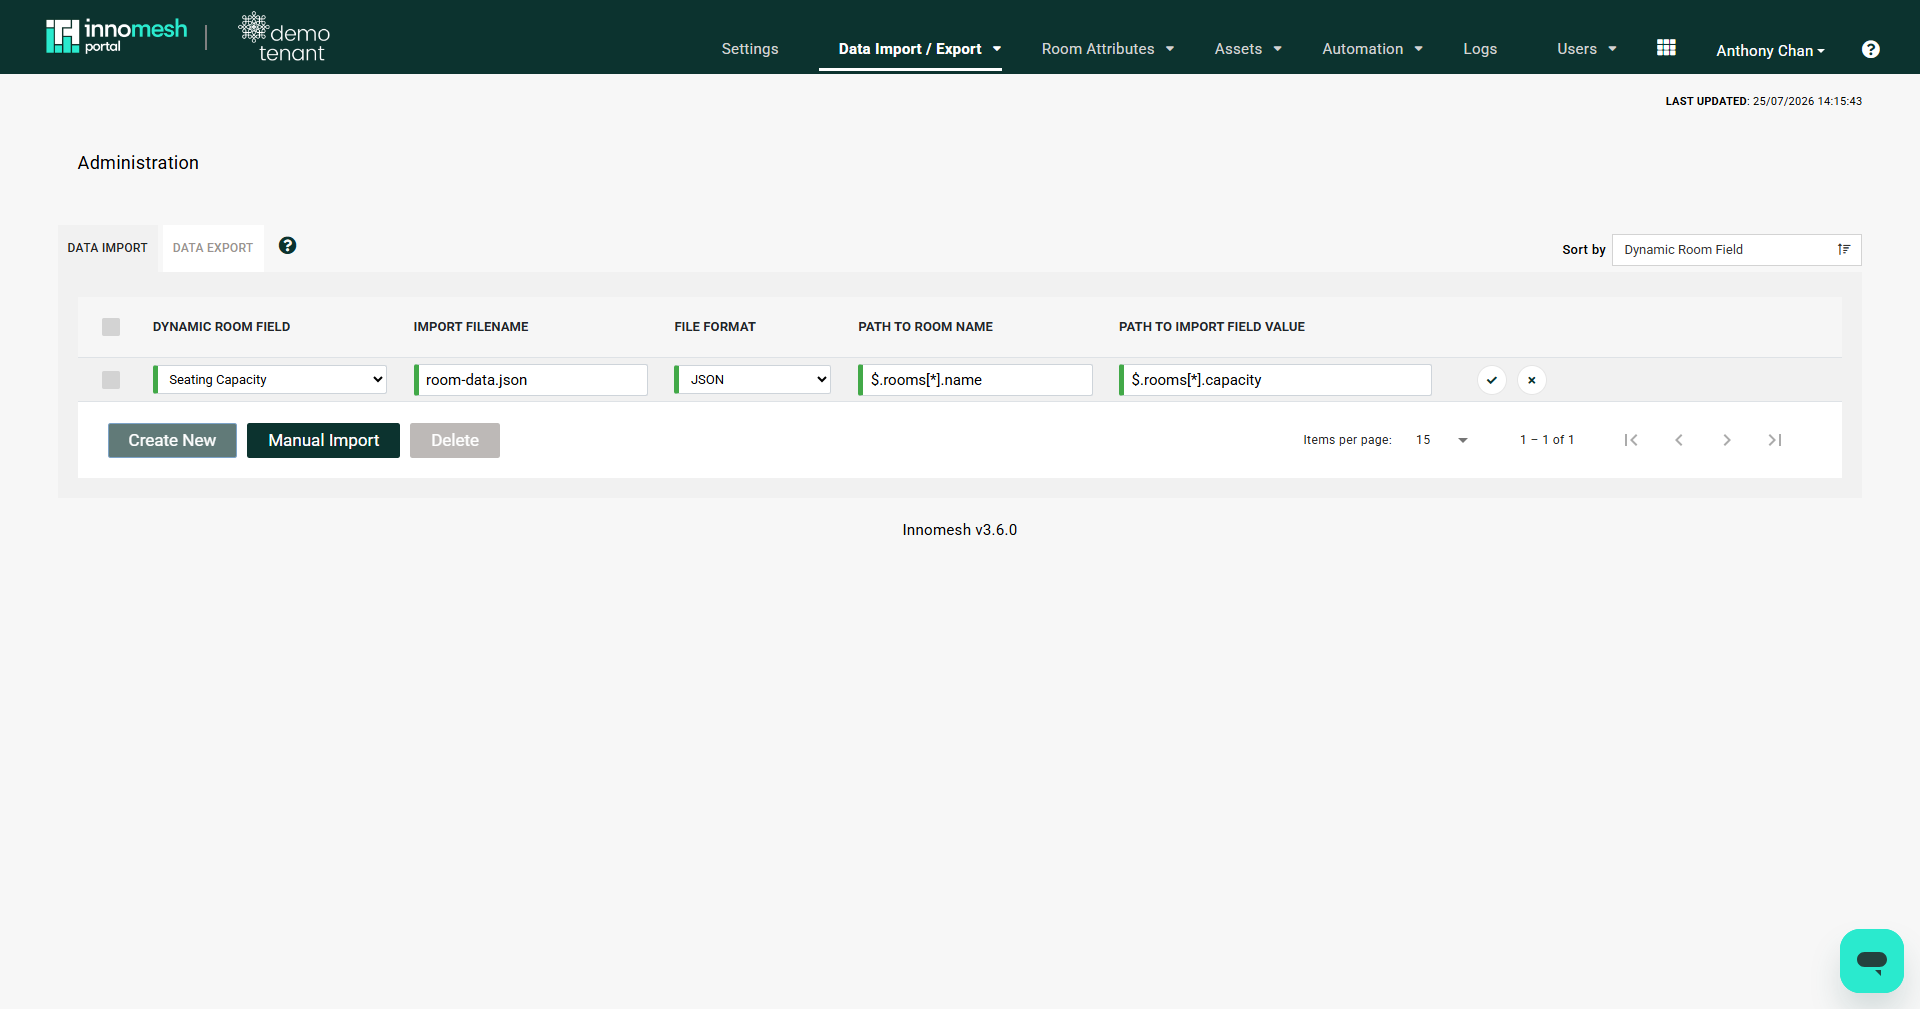
Multiple import configurations can be active at the same time, each targeting different source files or fields.
Example: CSV File
The first row holds the column headings, and each row after it holds one room:
Room Name,Seating Capacity,Floor Area
B1-101,40,85
B1-102,24,50
B2-201,120,210
Two configurations import the Seating Capacity and Floor Area columns from room-data.csv:
| Dynamic Room Field | Import Filename | File Format | Path to Room Name | Path to Import Field Value |
|---|---|---|---|---|
| Seating Capacity | room-data.csv | CSV | Room Name | Seating Capacity |
| Floor Area | room-data.csv | CSV | Room Name | Floor Area |
Example: JSON File
The same data as JSON:
{
  "rooms": [
    { "name": "B1-101", "capacity": 40, "area": 85 },
    { "name": "B1-102", "capacity": 24, "area": 50 },
    { "name": "B2-201", "capacity": 120, "area": 210 }
  ]
}
Two configurations import the capacity and area values from room-data.json:
| Dynamic Room Field | Import Filename | File Format | Path to Room Name | Path to Import Field Value |
|---|---|---|---|---|
| Seating Capacity | room-data.json | JSON | $.rooms[*].name | $.rooms[*].capacity |
| Floor Area | room-data.json | JSON | $.rooms[*].name | $.rooms[*].area |
Running a Manual Import
Manual imports upload a CSV or JSON file directly through the browser. Use them for bulk updates or initial data population without setting up an automated schedule.
Create the import configurations before you upload. The file’s name must match their Import Filename.
- Open the Data Import tab.
- Click Manual Import.
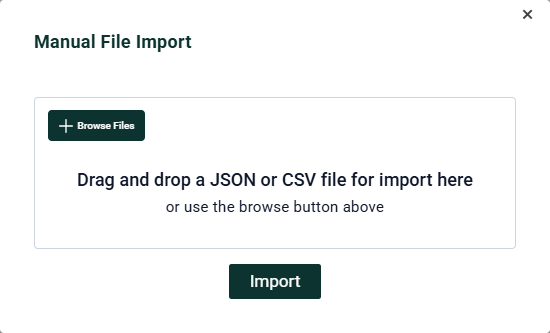
- Drag and drop a JSON or CSV file into the dialog, or click Browse Files.
- Click Import.
Managing Export Schedules
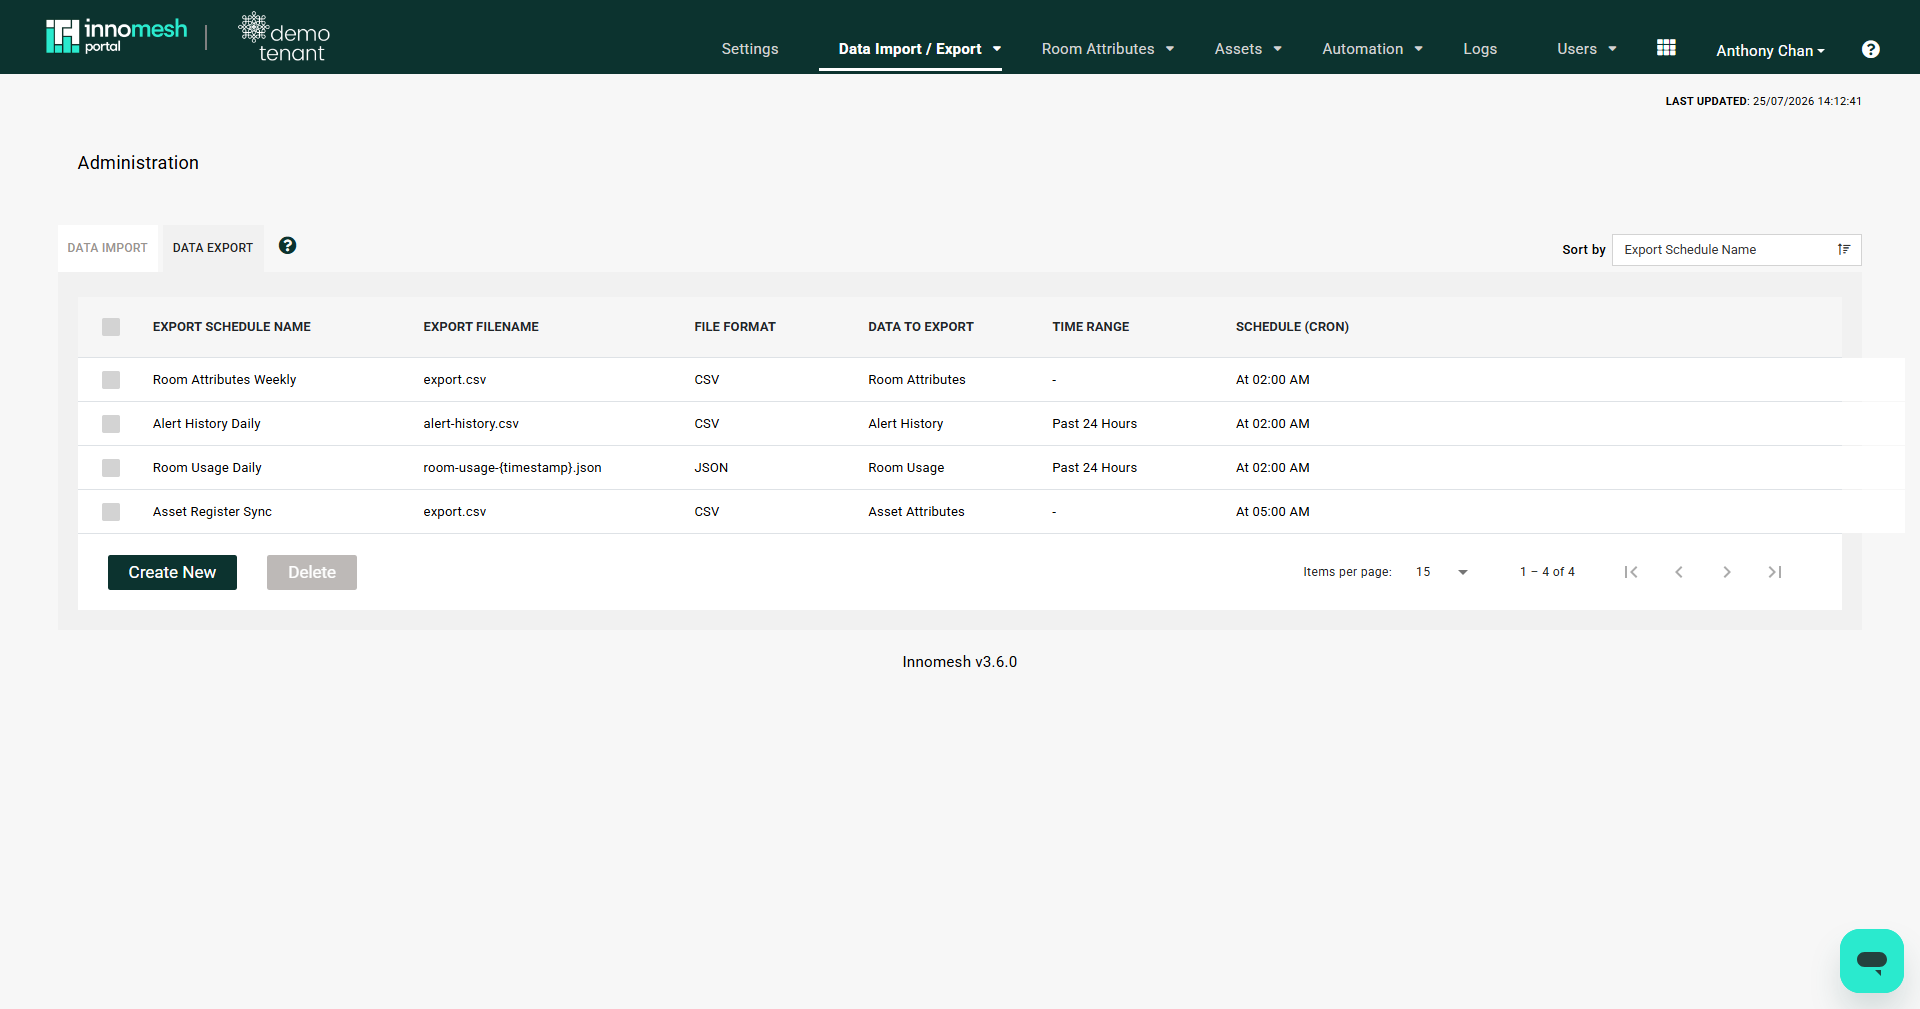
The Data Export tab lists every export schedule with its filename, format, data type, time range, and cron schedule.
Creating an Export Schedule
- Open the Data Export tab.
- Click Create New.
- Complete the dialog:
| Field | Description |
|---|---|
| Name | A unique schedule name. Only letters, numbers, hyphens, and underscores are allowed (no spaces) |
| Data to Export | Alert History, Asset Attributes, Room Attributes, Room Usage, or User Interactions |
| Export Filename | The filename written to the export repository. Include {timestamp} in the name to accumulate exports without overwriting earlier files |
| File Format | CSV or JSON |
| Cron Schedule | A six-field cron expression including seconds (e.g. 0 0 2 * * * runs daily at 2:00 AM). A human-readable translation appears below the field as you type |
| Time Range | For time-bound data types (Alert History, Room Usage, User Interactions), the window of data each run exports, such as the past 24 hours |
- For Room Attributes exports, choose which fields to include:
- Select fields in the Available Room Fields list. Fields marked with an asterisk are Smart Room Attributes.
- Click Add > to move them into Room Fields to Export.
- Click Create.
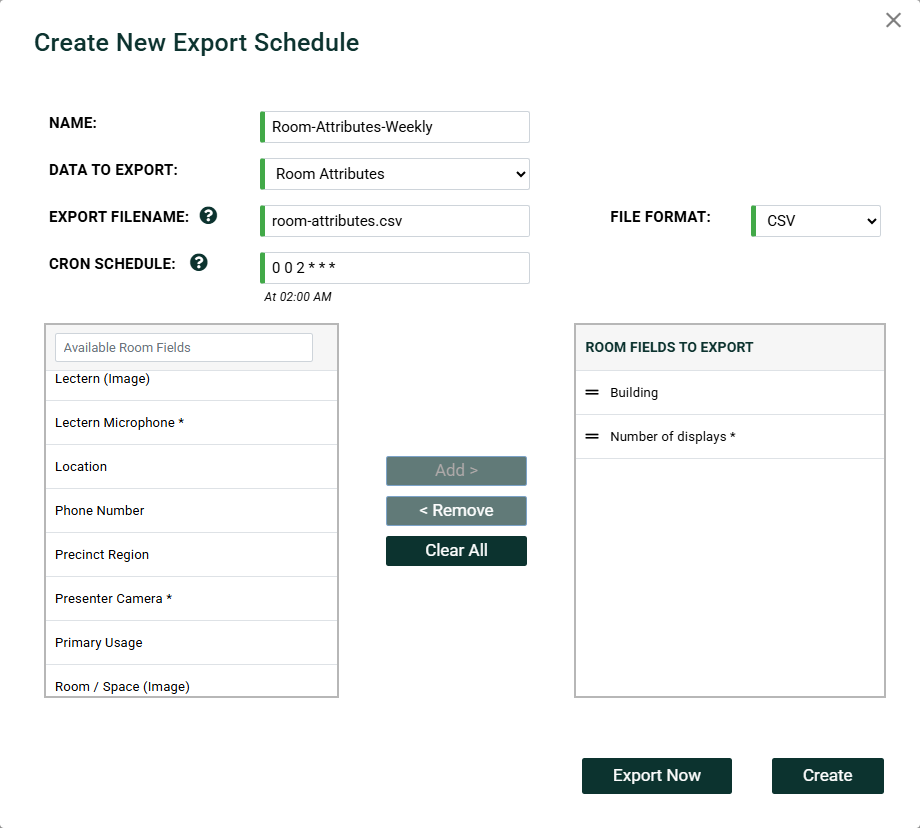
To run an export immediately without waiting for the next scheduled run, use Export Now in the same dialog.
Verification
- A saved import configuration appears as a row in the Data Import table; the dynamic room field begins populating after the next matching file arrives in the shared repository. To check, open one of the file’s rooms on the Information page.
- A saved export schedule appears in the Data Export list. Use Export Now and confirm the file lands in the export repository to verify the configuration end to end.
Troubleshooting
| Symptom | Likely cause |
|---|---|
| No values appear after an import | The file’s name does not match the Import Filename of the configuration. |
| Some rooms have no value | Their names in the file do not match the room names in Innomesh. Records with an unknown room name are not imported. |
| Values are missing or wrong | The paths do not match the CSV column headings, or do not return the right values from the JSON file. |
| The field is not in the Dynamic Room Field list | The field is not set up as a dynamic room field. Ask Innomate to set it up. |